

This past summer I set out to work on building out a chatbot for our new website which will be launching in the near future. We wanted an automated way to direct visitors to site content that they might be interested in reading, one that offered optional live chat via Slack, and most importantly, doubled as a lead capturing solution. I had no experience in building chatbots so I did some research to find out which services were code-free, flexible, easy-to-use, cost-effective, and integratable with internal tools we use such as Slack, Pipedrive, and Mailchimp.
My research yielded a few viable automation solutions, with the top three being Leadformly (3rd place), DriftBot (2nd Place), and at the very top of the list Continually — the solution I ended up selecting for a number of reasons, but mainly because it checked off every single box on our requirements list.
Why Continually?
After building out the entire chatbot conversation workflow, I can now happily say that choosing Continually as an automation solution was the correct option, and here’s why:
- It's cost-effective. Their “Essentials” plan only costs $17 per month, allows for 10,000 page views, offers the option to remove their “Continually” branding from the chatbot itself, and integrates with several applications. For comparison's sake, Driftbot’s free plan met almost none of our prerequisites, and their next cheapest plan cost $50 a month.
- It's user-friendly. Continually was one of the chatbot services that advertised that their solution was code-free, meaning anyone could build out a workflow without a developer’s help. In my experience the builder extremely easy to navigate as a first-time user.
- It offers a wide array of functionalities. Continually’s chatbot solution includes many features and provides users with a lot of flexibility. Users can build entirely custom multi-language bots from scratch with Continually’s simple, drag-and-drop user interface, or they can opt to take advantage of a pre-configured bot. Site visitors can initiate live chat through the bot via Slack at whatever times you tell the bot your staff is online to answer questions, and the bot can connect to your team’s Google Calendars to automate the process of site visitors booking a meeting with your team.
- It's flexible. The Continually chatbot has a very sleek aesthetic and also allows users to set the bot to communicate with site visitors in a number of ways. Including but not limited to name, company, email, and phone capture; multiple-choice, drop-down, and open questions; file uploads, linking to site content, sending GIFs, configuring unique variables (important), and it’s even GDPR-friendly!
- It's integratable. In addition to the above, Continually integrates with a number of other applications. One of the simplest and easiest integrations provided within the builder itself, is Google Sheets. Chatbot builders can take advantage of Google Sheets integration and automate the collection of data so that a row is updated within a given sheet as the bot captures information in real-time. In addition to this Continually offers several other integrations with applications such as Google Analytics, Hubspot, Slack, Mailchimp, Google Tag Manager, WordPress, Salesforce, and more!
Lead Capturing through Pipedrive
To function as a lead capturing solution, it was important that the chatbot service we selected integrated with our chosen sales management software, Pipedrive. Pipedrive is a cloud-based CRM tool for salespeople who require simplified sales management and automation. There were a few automation solutions that integrated with Pipedrive directly, but we passed on them in favor of Continually, for a couple of reasons. For one, it met every single one of our other desired specifications, and most importantly, because Continually’s “Essentials Package” offered a Zapier integration.
For those unfamiliar with the service, Zapier is an online automation tool that connects 2,000+ web applications via a user-created workflow that tells one app when and what to communicate to another app. To our fortune, Zapier connects Continually chatbot data with Pipedrive. The starter Zapier plan costs $20/mo and allows for 750 tasks, which we felt is more than enough to capture lead information from the chatbot and pull it into Pipedrive. Our agency doesn’t anticipate that more than 750 site visitors will be interacting with the chatbot every month to the length of actually initiating the lead capture stage of the conversation workflow, so the Essentials Plan works out nicely for our purposes.
One downside was that connecting Continually with Pipedrive via Zapier didn’t seem to be a common automation, so there were very few online resources instructing users on how to build out a proper workflow between the two applications. Thankfully, I did the legwork to figure out the most effective way to utilize Zapier to pull information from chatbot conversations and send that data into Pipedrive automatically. I felt it necessary to write an article on this because building out this particular workflow was not as cut-and-dry that Zapier (or Continually) makes it out to be.
Before I get into the full Zapier configuration tutorial, let's quickly go over what NOT to do.
Configuring Zapier Incorrectly
I initiated our Zapier subscription under their free plan until I realized that the free plan limits users to single-step zaps. Single-step zaps are great when you only need to complete simple automations, like forwarding a new Pipedrive contact’s email address to your Mailchimp email subscription list. Unfortunately, building out a Continually/Pipedrive integration is far more complex and requires at least one multi-step zap.
My original solution was not to import data from Continually directly into Pipedrive, but rather to pull data into Pipedrive as a pre-configured Google Sheet connected to the chatbot was updated in real-time. It takes a bit of time for Continually to “conclude” a conversation session, usually due to several minutes of inactivity, so I was hoping I could create a faster automation through Google Sheets.
In this first attempt, I set Zapier up to create a new person in Pipedrive the minute the cell that contained “name” information was populated in the Google Sheet. Then once their organization was populated into the Google Sheet, Zapier would create a new organization in Pipedrive. The same process would then be repeated for additional information collected in each unique variable cell I had configured, which would then be pulled in to create a “Note” or “Activity” in Pipedrive. Simple right? Wrong!.
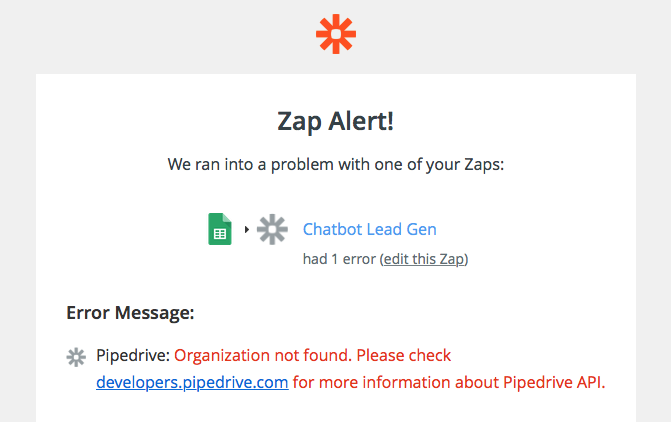
One thing that isn’t very intuitive in Zapier’s Pipedrive automation workflow builder, is the fact that if you want a new contact to be properly assigned to a specific organization in Pipedrive, the organization has to be created in Pipedrive before the new contact can be created. Another unintuitive part is that when Zapier triggers an organization to be created in Pipedrive, as far as Zapier is concerned, the organization within Pipedrive no longer goes by its name, instead, it is assigned a specific ID number, that you will need to reference if you want to set up any further automations for contacts, notes, or activities to be associated with that specific organization.
Unfortunately, Zapier has a 3-minute lag time between triggers, so my initial attempt with Google Sheets ended up triggering a lag-related error feedback loop. Basically, Zapier’s first trigger would attempt to create an organization in Pipedrive, then the second trigger would try to create a new contact and assign that contact to the new organization they provided. Due to the lag time that it takes Zapier to create a new organization in Pipedrive, there were errors trying to connect a new contact to that organization — because at the moment that second trigger fired, the organization didn’t exist yet. The same thing happened in my next steps of the funnel as I tried to tag a new activity and note, to a person and/or organization that didn’t exist yet. Zapier recognizes these errors when they happen and emails you a number of warnings to notify that something isn’t firing correctly.
Even if you tried this same multi-step approach by pulling ALL Continually data through Zapier (which is an integration option), rather than pulling individual answers in one-by-one from Google Sheets, this same lag-related error will occur. After trying and failing a number of times, receiving 20+ error notification emails I was stumped, but I was also determined to find a workaround – so I did.
Check out my workaround below in Part 3!
How to Bypass Zapier's Lag Limitations
By taking advantage of Zapier’s ability to connect to both Google Sheets and Continually, we can bypass the automation lag.
Part 1: Configuring the Initial Single-Funnel Zap
Create a Zap to pull the company name in from Google Sheets and create a new organization in Pipedrive immediately as it updates in real-time (this will account for lag).
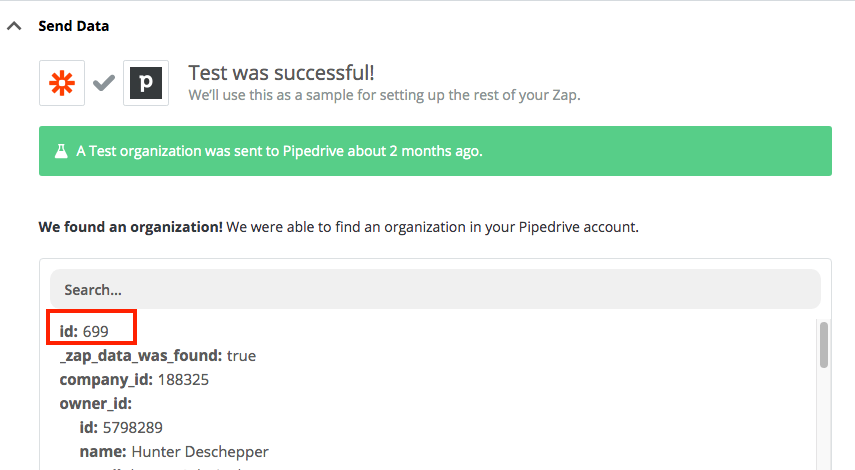
Remember to take note of the newly-created Organization ID, after running a test zap you will find the Org ID here:
Part 2: Preparing the Multi-Funnel Zap
- Instead of Zapping Google sheet variables into Pipedrive like I originally attempted, create a second Zap to connect Continually with Pipedrive, and pull in all the chatbot’s conversation data. Because Continually takes a moment to save data after a conversation has concluded, that gives Zapier ample time to have created an organization before it becomes time to assign other things to said organization such as Contacts, Notes, and Activities.
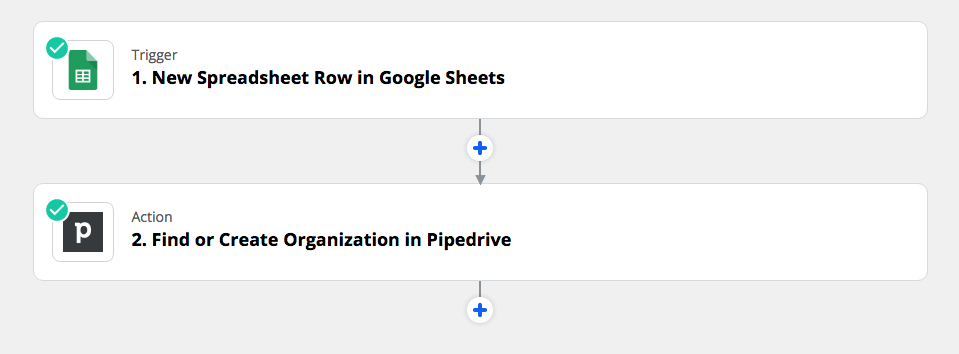
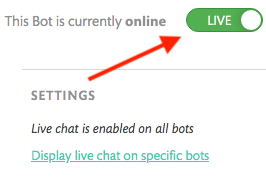 To prepare for configuring the new multi-funnel Zap, which will eventually end up looking like the image above; make sure to set your latest chatbot version to “Live” within Continually’s “Bots” section. You will then visit Continually’s “Landing Pages” section, and create a new landing page to feature your newly published chatbot on. Only here will Continually save official conversation data. Conversation data from the test bot is never officially saved in Continually, nor is any conversation data saved (even on the new landing page) if the bot’s status is not set to “Live”.
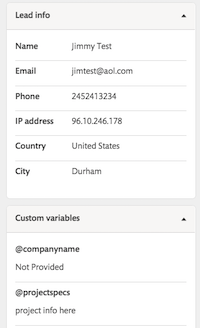 Once your bot is live on your new landing page, run through the entire conversation workflow and make sure you’ve answered every possible unique variable, this is the only way Zapier will have the sample data necessary to properly configure the multi-funnel zap. Once your conversation is concluded you can visit the “Live Chat” section on the website and visit “Closed Chats” click on your archived test conversation. If you have successfully answered all of the variables in the workflow, you will see all of the Lead information and custom variable data filled on the sidebar.
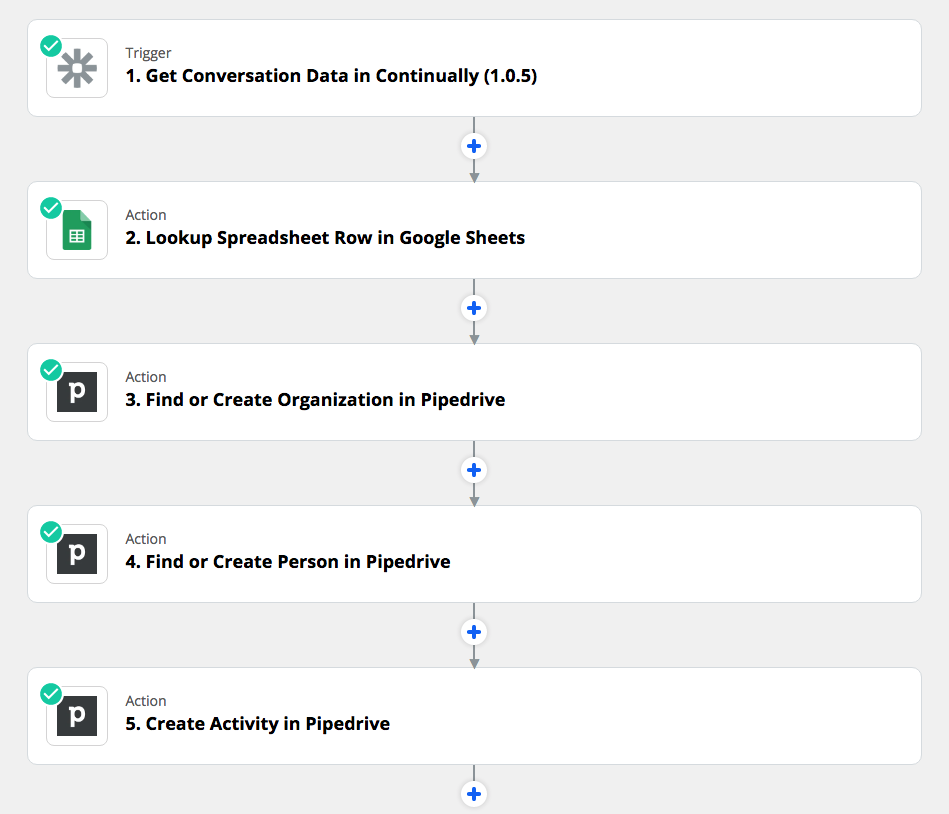
Part 3: Configuring the Multi-Funnel Zap
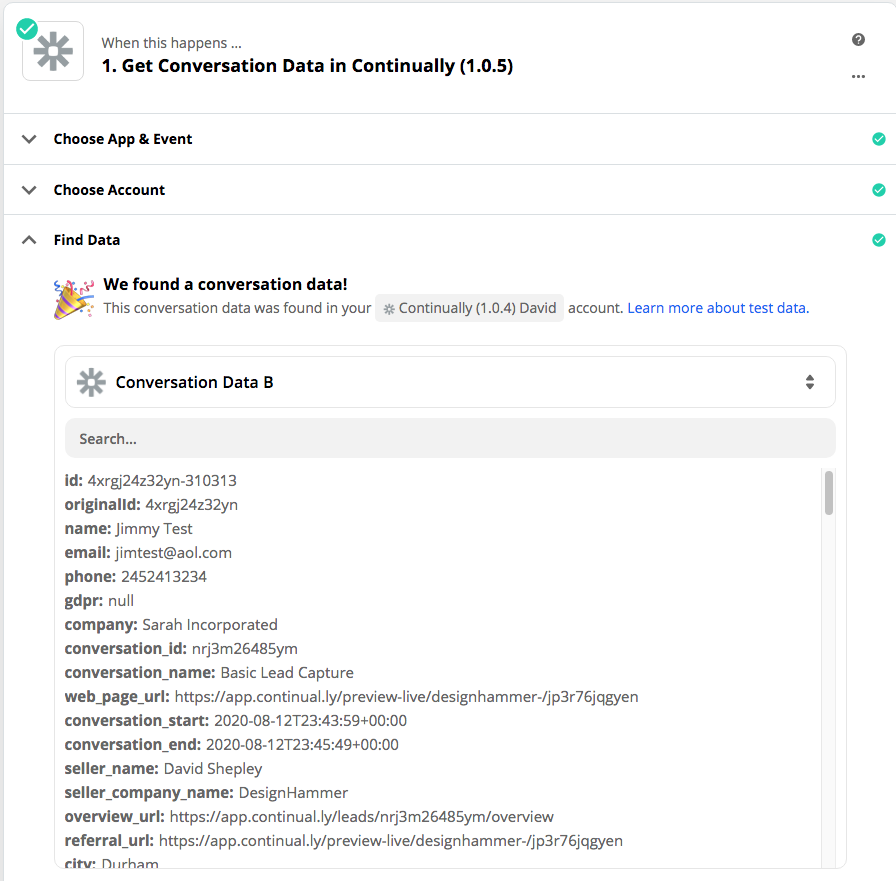
Step #1: "When this happens… [Get Conversation Data from Continually]"
- Pull in the data from your recent test conversation, be absolutely sure that you have answered all of the variables before doing so. Example image:
Step #2: "Do this: [Lookup Spreadsheet Row in Google Sheets]"
Now that the organization has been created in the first single-step zap, Zapier needs a data point to use in order to find the new Organization/Org ID in Pipedrive before you can create a new contact and attach them to the organization. Here's what to do next:
- Connect your Google Sheets account and connect Zapier to the correct Spreadsheet and worksheet.
- Zapier will show you different column names from the sheet, choose “Name”. We will search by the contact's name instead of their organization because full names are unique, whereas an organization's name might be repeated more than once.
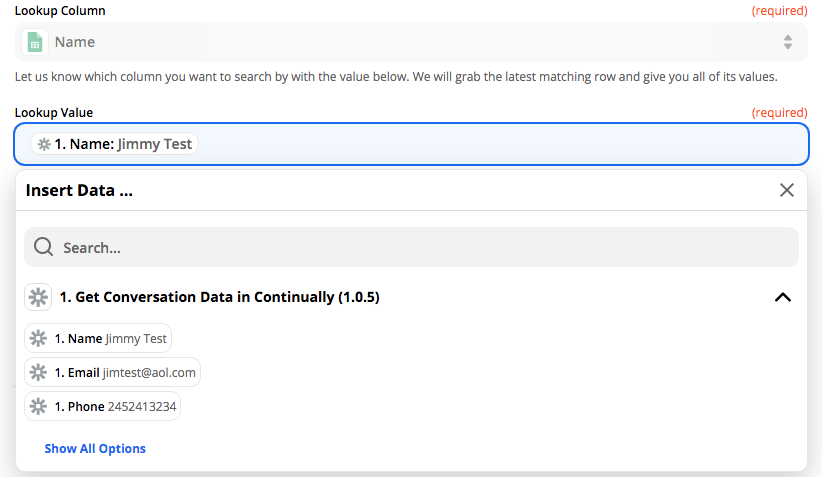
- Under “Lookup Value” is where you will find the person's name from within Continually data itself (i.e. not Google sheets).
- Leave "Supporting Lookup Column" and "Value" blank.
- Mark "Bottom-Up?" as True because new conversation data will always populate at the bottom of the Google sheet.
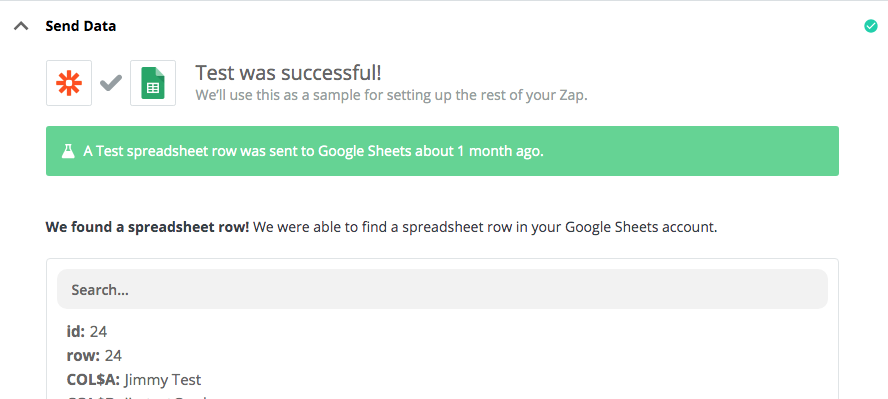
- Push to Send Test Data. A successful test will pull data from the correct Google sheet row.
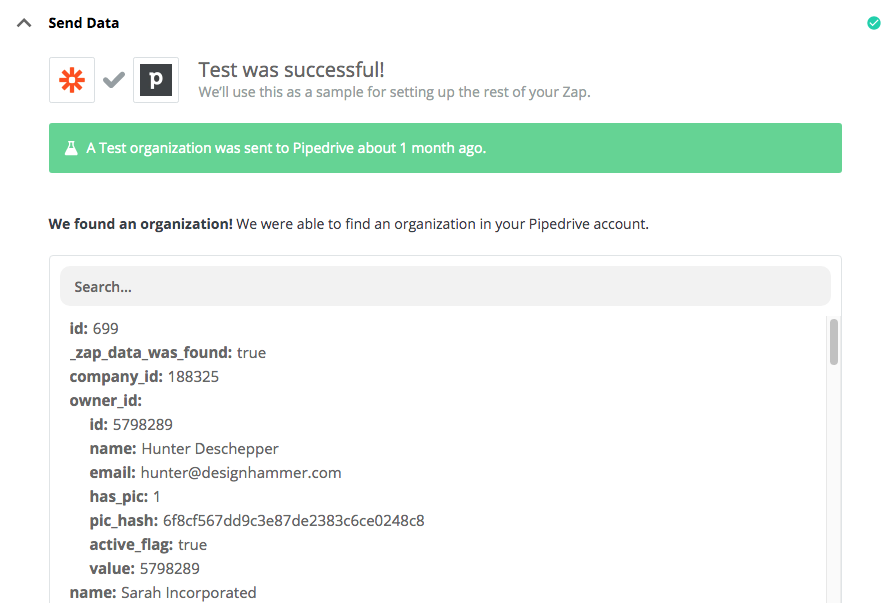
Step #3: "Do this… [Find or Create Organization in Pipedrive]"
Remember that the Organization needs to exist first within Pipedrive if we want to tie the new contact to that organization. Here's how to configure this step:
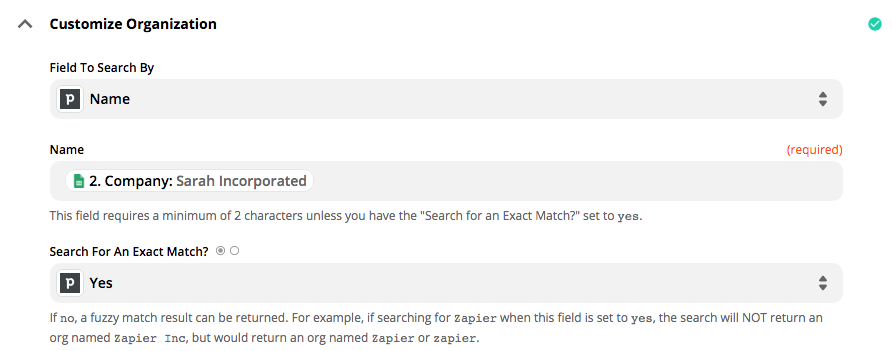
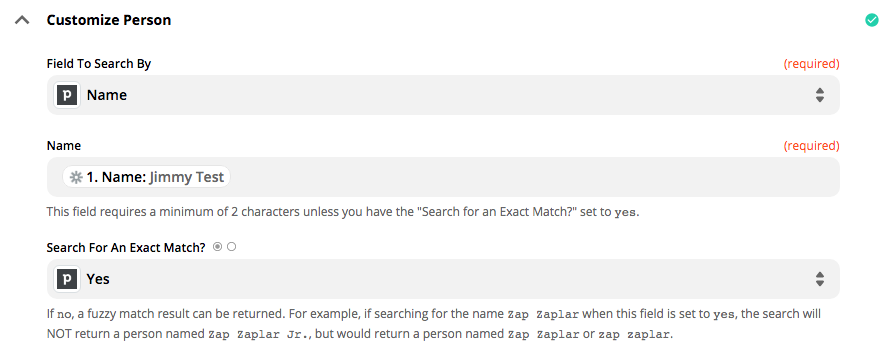
- Customize Organization: Pipedrive field to search by: Name [this is referring to the name of the organization not the person, and will help Zapier figure out the proper ID of the Org].
- Directly underneath that in the “Name” field, insert the organization's name data from the Google Sheet NOT Continually (you will see both options listed)
- Search for an exact match? Select “Yes”. Your configuration should look like this so far:
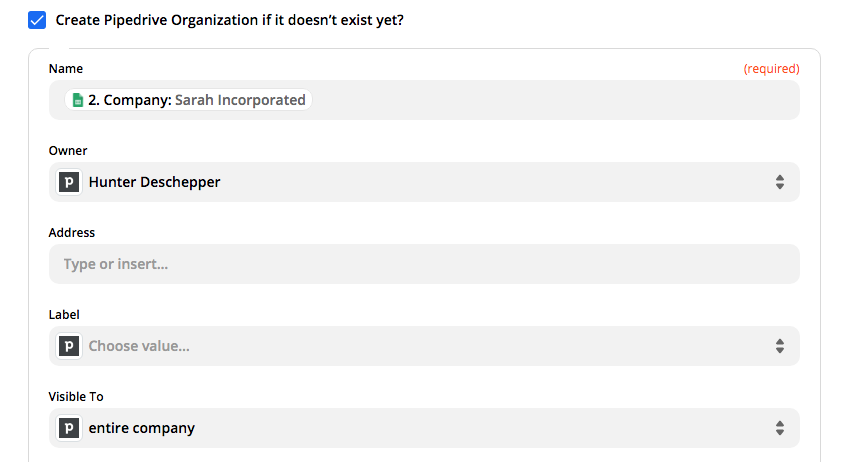
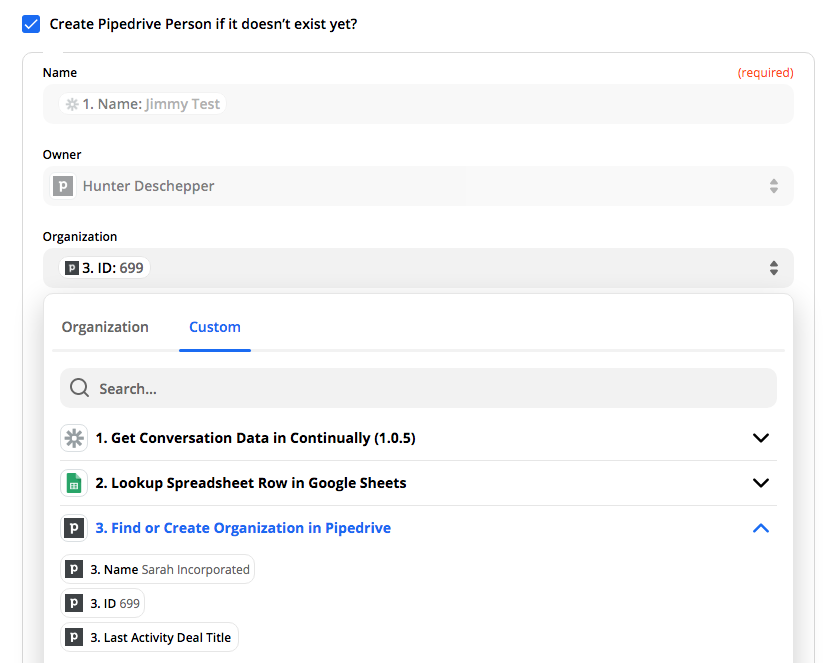
- Check the box that says: “Create Organization if it doesn’t exist yet?”
- Pull the organization from the Google Sheet Data like before, select any owner, and choose if you want this info to be visible to the entire company (recommended)
- Send a test. Zapier should have been able to link the Organization name from the Google sheet, with the existing Organization that was created in Pipedrive earlier during the first Zap. Remember the Org ID from before: #699, this is a random number that Pipedrive attributes to an individual organization when it is first created. The same goes for new person contacts.
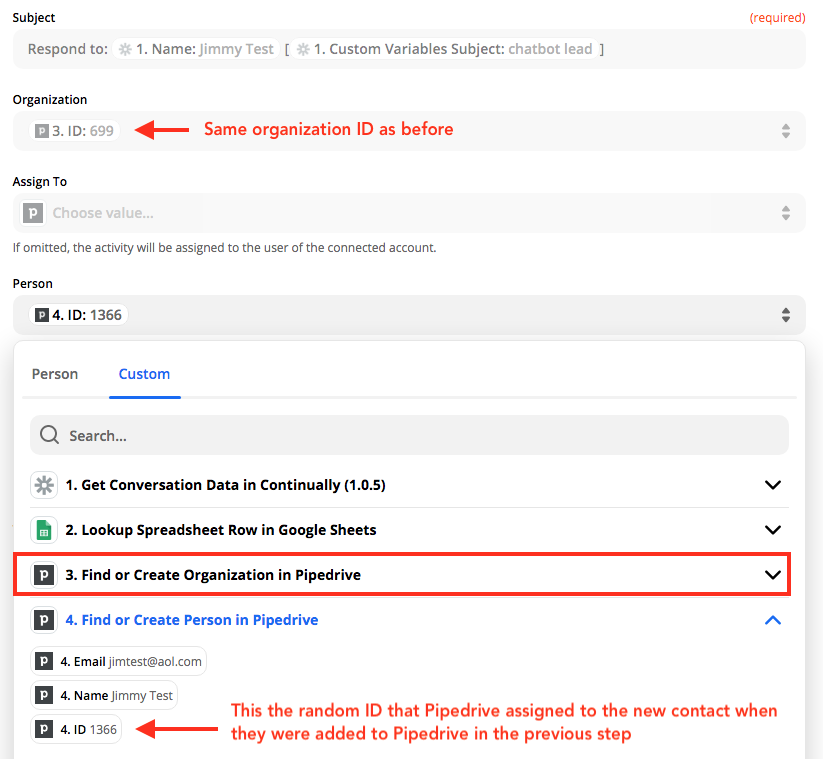
Step #4: "Do this: Find or Create Person in Pipedrive"
- This Zap will be built out the same as in Step 3 except now, instead of using data from Google Sheets, we will be pulling data in from Continually and Pipedrive since we have already told Zapier to pull in Pipedrive data through in the previous step.
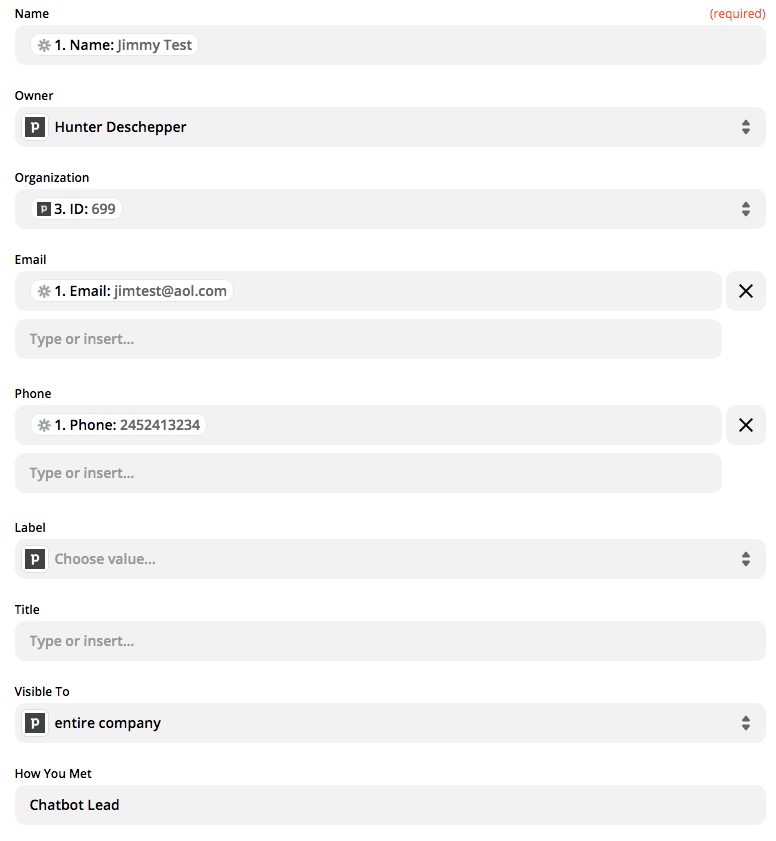
- Because the new contact has not been added to Pipedrive yet, this is where we check “Create Pipedrive Person if it doesn’t exist yet?” Then we will use Continually data to populate the contact’s name, and the Pipedrive data to connect that person to the Pipedrive Organization’s ID (not name).
- Here is where we can pull in more details about the contact depending on what variable questions you asked in your bot and which information they willingly gave you such as email address and phone number. I suggest manually typing “Chatbot Lead” under “How You Met” – this will appear in Pipedrive under all Leads that were generated via the Chatbot rather than input by your sales staff, for clarifications sake. Your configuration should look something like this:
- Send your test.

Step #5: "Do this… [Create Activity in Pipedrive]" (Recommended)
This is where you can use all of the important custom variable information you included in your chatbot and connect it to that person’s Pipedrive profile in the form of a note, as well as a task on your calendar to respond to them.
- Customize the activity fields in a way that makes sense to you by using custom variable data pulled in from Continually. But, for “Organization”, and “Person” be sure to pull in the ID fields that we discovered for each in the previous steps. NOT their proper names.
- Set the Type to "Task"
- Fill in the Note section using HTML if you want to separate different variable information (plain text will look cluttered without stylizing).
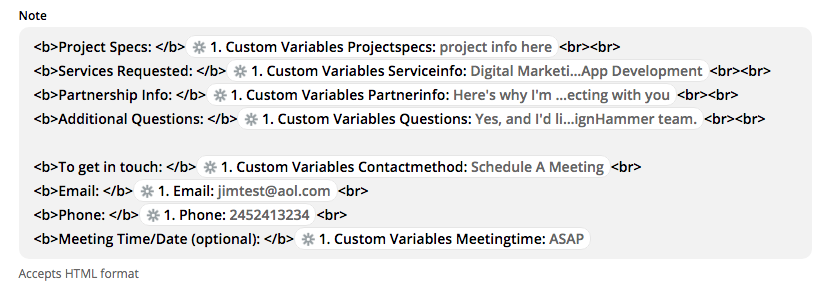
Most of these are custom variables that I have recorded from within the chatbot conversation. Your variables may look different depending on what questions you ask your site visitor. Here is the plain text version of my HTML note above:
Step #6: Turn on the Zap!
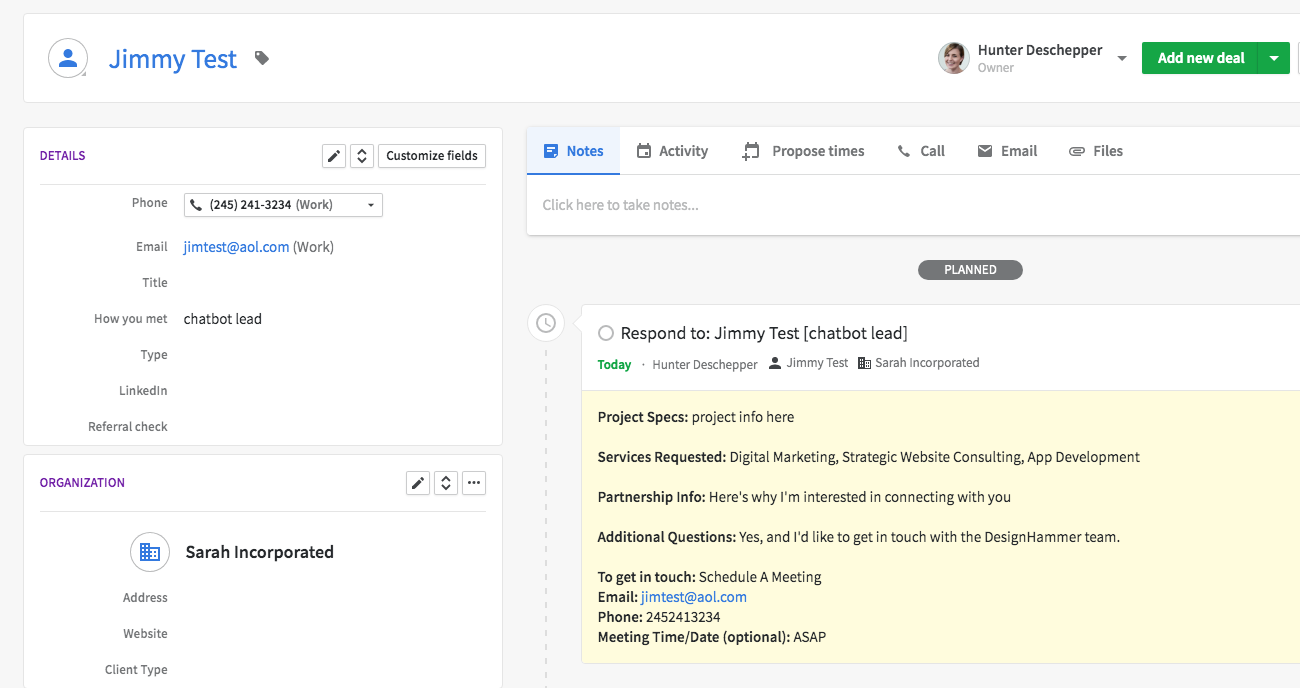
Be sure to check Pipedrive to make sure that the tests you pushed (above) pushed through correctly to Pipedrive
A successful contact profile page connected to the correct organization with an activity note attached will look like this:
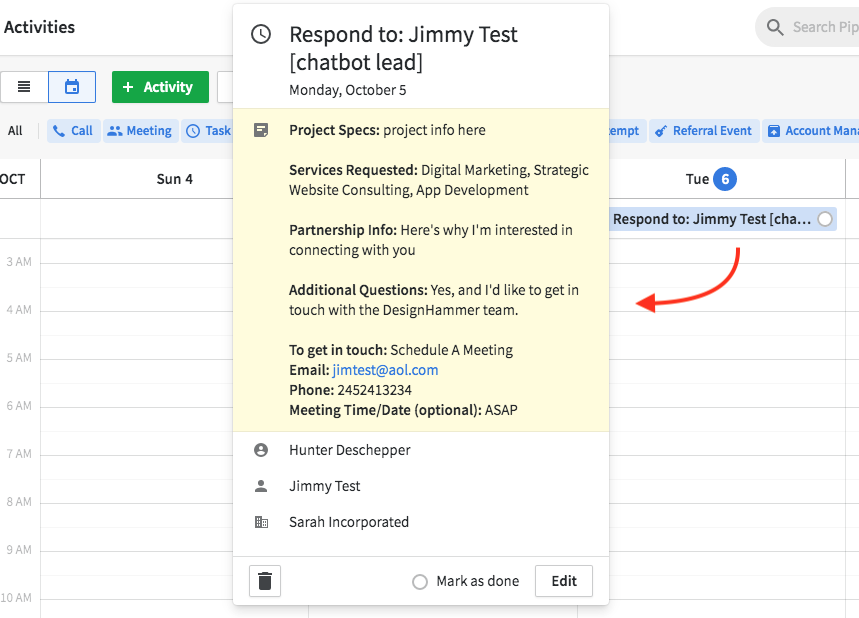
The note in your activity calendar will look like this:
That's all!
I hope anyone stuck on this configuration has found my step-by-step instructions useful. If you have any questions or are stuck on any part of the instructions, leave a comment below!